Promotion
Use code SIZZLE26 for 25% off sitewide!

By clicking “Accept,” you agree to the use of cookies and similar technologies on your device as set forth in our Cookie Policy and our Privacy Policy. Please note that certain cookies are essential for this website to function properly and do not require user consent to be deployed.
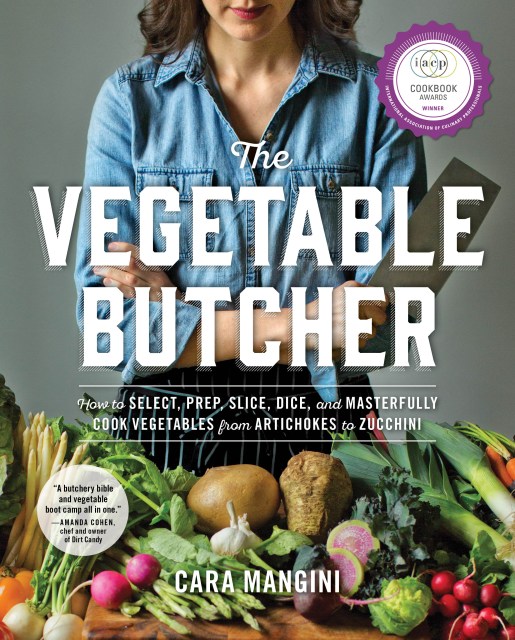
The Vegetable Butcher
How to Select, Prep, Slice, Dice, and Masterfully Cook Vegetables from Artichokes to Zucchini
Contributors
By Cara Mangini
Formats and Prices
- On Sale
- Apr 19, 2016
- Page Count
- 352 pages
- Publisher
- Workman Publishing Company
- ISBN-13
- 9780761184263
Price
$16.99Price
$21.99 CADFormat
Format:
- ebook $16.99 $21.99 CAD
- Hardcover $35.00 $44.00 CAD
This item is a preorder. Your payment method will be charged immediately, and the product is expected to ship on or around April 19, 2016. This date is subject to change due to shipping delays beyond our control.
Buy from Other Retailers:
A root-to-leaf guide to vegetable butchery, with 150 recipes. Winner, IACP Cookbook Awards for Single Subject and People's Choice.
Applying the skills of butchery to the unique anatomy of vegetables—leafy, lumpy, stalky, gnarly, thin-skinned, or softly yielding—Cara Mangini shows, slice by slice, how to break down more than 100 vegetables for their very best use in the kitchen. Here's how to peel a tomato, butcher a butternut squash, cut cauliflower steaks, and chiffonade kale. How to find the tender, meaty heart of an artichoke and transform satellite-shaped kohlrabi into paper-thin rounds, to be served as a refreshing carpaccio.
And then, more than 150 recipes that will forever change the dutiful notion of "eat your veggies"—Grilled Asparagus, Taleggio, and Fried Egg Panini in the spring; summery Zucchini, Sweet Corn, and Basil Penne with Pine Nuts and Mozzarella; and Parsnip-Ginger Layer Cake with Browned Buttercream Frosting to sweeten a winter meal. Plus everything else you need to know to enjoy modern, sexy, and extraordinarily delicious vegetables—and make the the center of the meal.
-
“The book is loaded with photos and is smartly designed. Readers will come away with plenty of new techniques and tips for breaking down artichokes, conquering the fear of prepping nettles (gloves, tongs, and kitchen shears are a must) in order to prepare nettle pesto and ricotta crostini, and prepping beets.” —Publishers Weekly
“For cooks flummoxed by fava beans or perplexed by purslane, Mangini (once a "vegetable butcher" at Eataly, an Italian marketplace in New York City) demonstrates the essentials of cutting and preparing more than 50 kinds of vegetables and herbs…Blending practical aspects found in such manuals as Jacque Pepin’s New Complete Techniques with the varied recipes familiar to titles such as Michael Anthony’s V Is for Vegetables, Mangini’s debut will augment most vegetable cooking collections.” —Library Journal
“People get so flustered by vegetables that I think it's best to start with the basics, and The Vegetable Butcher is a butchery bible and vegetable boot camp all in one. If you ever wanted to know how to slaughter a squash or eviscerate an eggplant, here's where you start.” —Amanda Cohen, chef and owner of Dirt Candy
“With step-by-step butchering instructions and a bunch of tasty recipes, The Vegetable Butcher demystifies a cornucopia of vegetables, including up-till-now esoteric ones like cardoons, crosnes, and stinging nettles. Hooray, more vegetables to play with!” —Sara Moulton, TV host and author of Home Cooking 101
“When things are done properly, they get easier. In The Vegetable Butcher, Cara Mangini shares simple recipes that highlight a vegetable's flavor, but more importantly, teaches you the proper…way to slice, dice, and julienne it.” —Epicurious
“Chef Cara Mangini’s forthcoming book, The Vegetable Butcher, is nothing short of a veg-o-pedia. It’s packed with tips for buying the best stuff, plus a haul of killer recipes and step-by-step instructions for slicing and dicing everything from artichokes to zucchini.” —Dr. Oz THE GOOD LIFE
“For someone new to cooking, this book will become a well-worn reference, while seasoned cooks may benefit from pieces on lesser-known produce, like crosnes and cardoons. All can enjoy the 150 recipes (mostly savory, but some sweet), which include some surprising yet effective cooking methods and intriguing flavor pairings.” —Fine Cooking
“While most Americans view preparing produce as a tedious chores—and a barrier to cooking veggie-heavy meals—chef Cara Mangini, who comes from a family of meat butchers, sees it as a pleasure. In her new book The Vegetable Butcher, Mangini shares the knife skills needed to break down a whole garden of vegetables efficiently enough for a weeknight dinner.” —TIME magazine
“If you love vegetables, this book is a must-have!” —Dorie Greenspan
“An encyclopedic guide to vegetables … full of revelations.” —The Washington Post
“It is THE guide for selecting, preparing, slicing, dicing and, of course, cooking all things vegetable.” —The Chicago Tribune