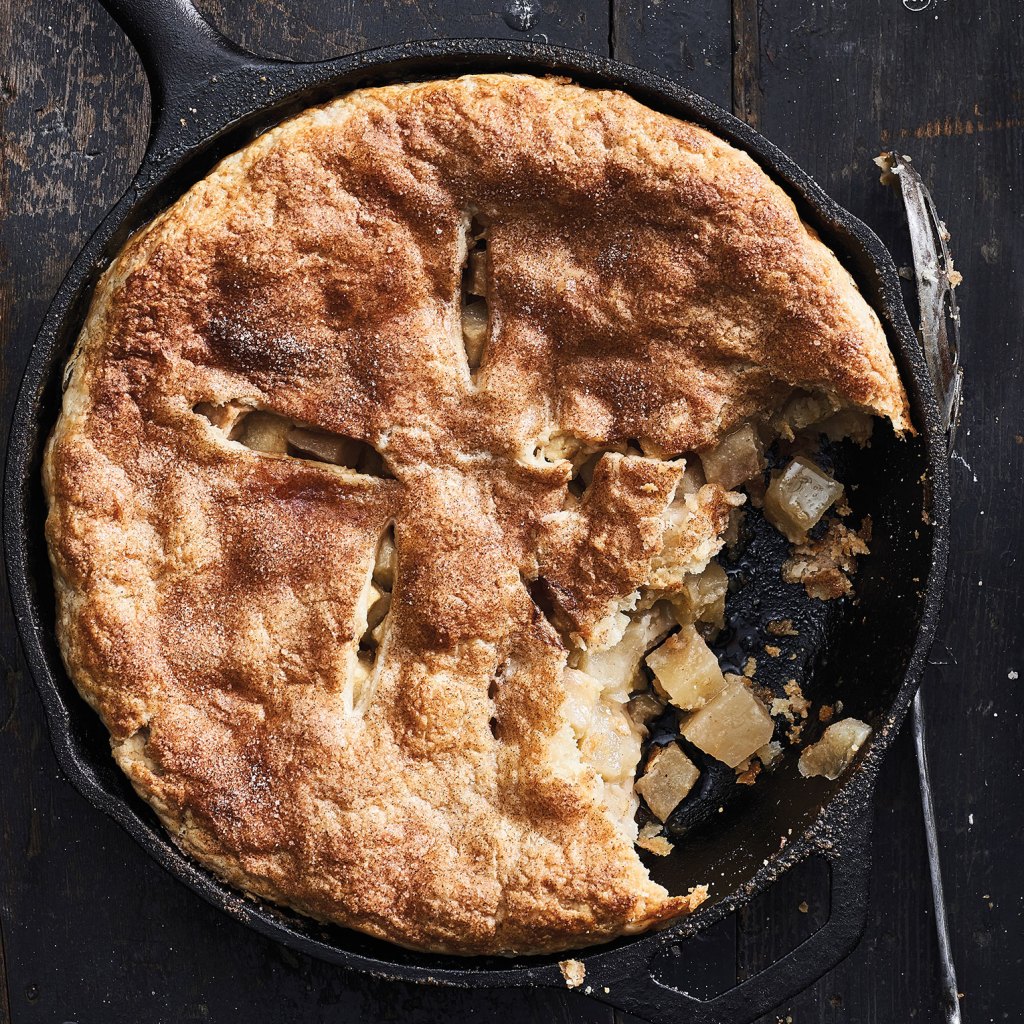
Cast-Iron-Skillet Diced-Apple Pie
This double-crust apple pie, baked in a skillet glazed with brown sugar, doubles down on the caramel-apple classic fall flavor.
Apple is America’s signature pie: not just something we love to eat, but a universal symbol of things we hold dear. Is it any wonder, then, that making an apple pie is one of fall’s enduring rituals?
To some degree, whether it is store-bought or homemade, or even how it tastes, is irrelevant: apple pie enjoys iconic status in this country, and we cherish it all the same. You may have a single, irrefutable memory of what constitutes a true apple pie — maybe it was the one your grandmother or mother baked. For me, it was the one my mom and dad made, with a Crisco crust and McIntosh apples. But perhaps the most surprising thing about apple pie is just how varied it can be.
One of the things I love most about apple pie is that it marks the unofficial start of the fall baking season. Relief from the oppressive summer heat arrives, bringing with it a renewed interest in dusting off favorite recipes and baking almost every weekend. There are family outings to farm markets and orchards to procure the best local apples. Warm, fresh pies are delivered to friends and family, strengthening ties loosened by months of vacations and far-flung endeavors. Apple pie brings us home, in a very real sense, and envelops us in the warmth of domestic well-being.
Tips for Baking Delicious Apple Pies
- Start with the best fruit you can find. If you have access to local orchards, talk to the people who grow the apples. They can give you guidance on regional apple varieties that may be perfect for pies.
- You can work miracles on lackluster apples with the addition of lemon juice or a little apple butter, apple jelly, or boiled cider to the filling.
- To make a more compact pie with a dense filling, cut some of the fruit into slices and some into small chunks. You’ll get more fruit into the filling that way.
- Don’t go overboard with sugar in apple pies. Sweetness is appropriate, but you don’t want to obscure the pleasant, understated flavor notes of good apples.
- Don’t underbake apple pies (or any fruit pie, for that matter) or the thickening will not “take,” leaving you with a runny filling. In most cases, you want to see thick fruit juice bubbling up somewhere: through the vents, around the edge of the pie, from cracks in the crumb topping.
- Always cool the pie for at least 1½ hours — and preferably 2 — so the juice can develop body and has a chance to reabsorb into the fruit.
Cast-Iron-Skillet Diced-Apple Pie
A new generation of cooks seem to have discovered the utility of cast-iron cookware, because the stuff is getting an awful lot of attention these days. And why not? Cast iron is a bargain compared to a lot of cookware, it conducts heat beautifully, and it lasts forever. A cast-iron skillet will double as a deep-dish pie pan if that’s all you have, and even if it isn’t, I urge you to try this pie and see for yourself what a great job that skillet can do with a good old apple pie. Among other things, you’re going to like the brown sugar–glazed bottom crust and the caramel-like sauciness of the pie.
Makes 8–10 servings
Ingredients
- Double-Crust Food Processor Pie Dough (recipe follows) or another double-crust dough
Filling
- 3 tablespoons unsalted butter
- ¼ cup plus 3 tablespoons packed light brown sugar
- 6 cups peeled, cored, and diced apples
- 1½ tablespoons lemon juice
- ¼ teaspoon ground nutmeg
- ¼ cup plus 1 tablespoon granulated sugar
- 2 tablespoons cornstarch
- 2 tablespoons heavy cream, plus some for glaze
- ¼ teaspoon ground cinnamon, for glaze
Directions
Prepare and refrigerate the pie dough for at least 1 hour.
Double-Crust Food Processor Pie Dough
Generally speaking, I think most food processors do a better job with single-crust recipes than with double-crust ones: because there’s less bulk in the machine, single crusts mix up more evenly. However, it’s quite possible to make a double-crust batch successfully, especially if you take care to read all the notes. You need a food processor with at least a 12-cup capacity to handle a double-crust recipe.
Makes one 9- to 9½-inch standard or deep-dish double-crust piecrust with top or two pie shells
Ingredients
- 2¾ cups all-purpose flour
- 1 tablespoon cornstarch
- 1 cup (2 sticks) plus 2 tablespoons cold unsalted butter, cut into ½-inch cubes, or ½ cup (1 stick) plus 6 tablespoons cold, cubed unsalted butter plus 4 tablespoons cold shortening or lard in small pieces
- ½ cup cold water
- 1 tablespoon white vinegar
Directions
Excerpted and adapted from Pie Academy © Ken Haedrich.

“The wide-ranging, well-curated mix of classic and contemporary recipes and expert advice make this an essential primer for avid home bakers.” – Library Journal, starred review
“Readers will find everything they’d ever want to know about making pie, and even the dough-fearful will feel ready to measure, roll, and cut.” – Booklist, starred review
“Fear of pie? Ken Haedrich to the rescue. Pie Academy takes you through everything pie related — perfect crusts, fillings, crimping techniques, blind baking, lattice toppings and more.” — Kathy Gunst, coauthor of Rage Baking and resident chef for NPR’s Here and Now
“A true baker’s delight.”— Amy Traverso, Yankee magazine food editor and author of The Apple Lover’s Cookbook
Trusted cookbook author and pie expert Ken Haedrich delivers the only pie cookbook you’ll ever need: Pie Academy. Novice and experienced bakers will discover the secrets to baking a pie from scratch, with recipes, crust savvy, tips and tutorials, advice about tools and ingredients, and more. Foolproof step-by-step photos give you the confidence you need to choose and prepare the best crust for different types of fillings. Learn how to make pie dough using butter, lard, or both; how to work with all-purpose, whole-wheat, or gluten-free flour; how to roll out dough; which pie pan to use; and how to add flawless finishing details like fluting and lattice tops. Next are 255 recipes for every kind and style of pie, from classic apple pie and pumpkin pie to summer berry, fruit, nut, custard, chiffon, and cream pies, freezer pies, slab pies, hand pies, turnovers, and much more. This beast of a collection, with gorgeous color photos throughout, weighs in at nearly four pounds and serves up forty years of pie wisdom in a single, satisfying package.

Related Books
-

The Harvest Baker
-
Maple Syrup Cookbook, 3rd Edition
-

The Apple Cookbook, 3rd Edition
-

The Pumpkin Cookbook, 2nd Edition
-
Cast-Iron Cooking