You Can Draw It in Just 30 Minutes

See It and Sketch It in a Half-Hour or Less

Contributors

By Mark Kistler

Formats and Prices

Price

$11.99

Price

$15.99 CAD

Format

Format:

  1. ebook $11.99 $15.99 CAD
  2. Trade Paperback $17.99 $23.49 CAD

This item is a preorder. Your payment method will be charged immediately, and the product is expected to ship on or around June 20, 2017. This date is subject to change due to shipping delays beyond our control.

“Sharpen your pencils and open your sketchbook; your teacher is waiting.”–Boston Globe

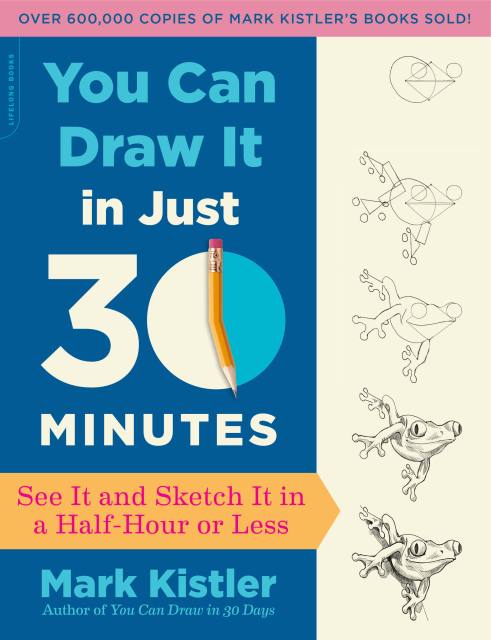
Emmy Award-winning and longtime PBS host Mark Kistler is back with You Can Draw It in Just 30 Minutes, the sequel to his hugely popular You Can Draw in 30 Days. Take a 30-minute creativity break and be amazed at what you accomplish! Learn to draw 25 different everyday objects–each completed in just half an hour–with step-by-step illustrations and friendly, personality-filled instructions for each lesson. Inside you’ll find:
  • Fun “art hacks”: Drawing shortcuts (such as tracing handy objects) make you more productive and efficient in your drawing.
  • Blueprints for quick drawings: You’ll learn to find the simple shapes within complex-appearing objects.
  • Long-term techniques: The skills you gain along the day in the individual lessons can be used in more detailed, longer projects.
  • Hundreds of variations: More cartoonish? More realistic? The drawings can be modified for a new work of art every time.
In 30 minutes, you’ll have a finished drawing. Pick up your pencil and begin today!

Excerpt

INTRODUCTION

Drawing can be terrifying.

I've taught millions of people to draw, and I see it all the time: the empty white page breeds pencil paralysis. Why? We don't know where to start and we fear "getting it wrong." Yet once I get my students to begin, to just touch pencil to paper, most of the time they fall in love with drawing.

Not only that, but people also assume that learning to draw involves a huge time commitment. They envision spending hours in front of a bowl of fruit or setting aside whole afternoons for sketching at an art museum. Certainly you could do these things. But you don't need a big block of time or any special location to get going.

That's why I decided to create a system for anyone—yes, that means you!—to quickly craft a realistic drawing. To draw anywhere, whenever the urge strikes, and to finish in a half-hour or less. Even if you're brand-new to drawing!

Will such fast work be perfect? Of course not. But the more you practice, the less nervous you'll feel about the outcome and—surprise!—your drawings will improve. My own drawings often don't turn out the way I planned; I recycle a lot of paper full of unsuccessful scribbles. I've been drawing for a lifetime, and I still learn every day. But I don't worry about it, and I hope, more than anything, that You Can Draw It in Just 30 Minutes frees you from drawing anxiety and helps you have fun and enjoy the process of learning to draw.

Here are the three simple elements that make this method work:

1. THE BLUEPRINT

Using my 30-minute system, during the first few minutes of each drawing lesson you'll create a blueprint of the drawing. In this phase I guide you to see and sketch not the object itself but the basic geometric shapes comprising it—shapes like triangles, rectangles, circles, and squares.

My plan is wily. I want to move you quickly away from "drawing" on that daunting blank page and into "refining" the shapes you've drawn. I want you out of your head and into the art zone. That's a fun place to be. That's where creativity flourishes. Self-consciousness and self-doubt are the creativity killers my 30-minute system is designed to help you break through.

Once your time is up and your drawing is down, polish it—or erase it, or scribble over it, or color it, or crumple it. (I recommend you keep it, even if you hate it. Come back to it after you've completed a few more drawings—you'll be amazed to see how far you've come!)

2. THE NEED FOR SPEED

Nothing breaks through an artist's block like a deadline, even if it's one you impose on yourself. So for each step of the lessons in this book I include recommended time limits—five- or ten-minute segments. Yes, I want you to set an alarm while you draw. Not kidding! Haste makes no waste if it means you get a drawing completed, no matter what it looks like.

If you run out of time in a given phase, go to the next step.

I encourage you to try each 30-minute drawing several times. Eventually you can take your time with these sketches if you want to. But the first time, go fast! So fast you're running far ahead of that inner voice telling you, "You can't do this."

3. THE HACK

Drawing fast and starting with a simple blueprint are two key parts of my devious plan to get you drawing and enjoying it (cue maniacal laugh). The third essential element is the "hack"—an easy trick to help you more accurately place parts of your drawings on the page.

The word "hack" may bring to your mind a person who produces pretty crummy work or the act of circumventing a computer's security system. Recently, though, the term is used to describe clever and quick workarounds for life's sticky problems, like how to slice an onion without crying (freeze it for ten minutes first!). This book is full of drawing hacks. In every drawing lesson I suggest shortcuts you can take, like tracing your pocket change to draw a circle, using the edge of your credit card to get your lines straight, or tracing your pinky or thumb to draw an oval.

My friends, this isn't cheating. Artists have used tools and aids for millennia, from the apprentices hired by Da Vinci through Disney and beyond, to the projectors used by Warhol, and certainly including the computer drawing and animation tools so readily available to all of us today. Something as simple as tracing a coffee cup to draw a circle is a tool, not a cheat. It will help you learn to translate what you see more accurately to the paper in the many freehand drawings I expect you'll be doing in the future. And even if you're never able to draw a circle without that mug, you don't have to worry about it and instead can free your mind to color creatively or embellish.

WHAT ABOUT CREATIVITY? ORIGINALITY?

In thirty years of teaching drawing the most common criticism I get is, "You teach people to copy what you're doing!" I can just hear the naysayers: "Now you're using hacks! Where's the creativity in that?" My reply: take a lesson with me and you'll see. Success in drawing now inspires creativity later.

Of course, to become proficient you'll need to practice. But I believe the prevailing methods of teaching drawing generate an awful lot of abandoned efforts in childhood and artistic blocks later in life. Many teachers still follow the method taught by Kimon Nicolaides. In his 1938 book The Natural Way to Draw Nicolaides says, "The sooner you make your first 5,000 mistakes, the sooner you'll learn to correct them." In reality, I think that only people with a rare, natural sense of how to draw what they see benefit from the trial-and-error method. They already have the self-reliance the rest of us are trying to develop. I love the Nicolaides book, but I believe people who experience some bit of early success and a sense of mastery tend to come back time and again to creative endeavors. I don't mean a "trophy-for-every-player" kind of reward, just enough of a recognizable drawing to feel encouraged to keep trying and build some resilience.

My lessons will give you confidence, encouragement, and basic skills. I promise: creativity will come. The more success you find with copying and hacking, the more eager you will feel to draw on your own. Moreover, as you develop artistic technique by copying shapes and shading, you will learn to see the whole world through the eyes of an artist. My goal: I want to make this book obsolete for you. Its lessons and tools will enable you to eventually create blueprints and refined drawings without it. When that happens, give the book to a friend and spread the joy of drawing around the world!

I strongly don't recommend exact copying or aiming for perfection, by the way, as you'll see throughout these pages!

30 DAYS VS. 30 MINUTES

My first book for adults, You Can Draw in 30 Days!, inspired me to write this new book. 30 Days! is a drawing school in a book, with 30 lessons that each build on the previous lesson. As I watched students use that book, I noticed how satisfied they felt each time they completed an individual lesson. I realized I could take my dream of getting everyone to feel confident drawing anytime, anywhere even further. So I devised this system enabling people to complete entire drawings—as opposed to pieces of drawings—in only a half-hour.

You Can Draw It in Just 30 Minutes! complements You Can Draw in 30 Days! You'll enjoy using the lessons in this book to practice the techniques you learned in 30 Days, but the books are very different, and you don't need my first book to get full value from this one.

WHAT YOU'LL FIND IN THIS BOOK

Each chapter is a complete drawing lesson, and all pretty much follow the same structure:

1. Every chapter opens with a personal anecdote, a photo of the object you'll be drawing, a list of tools you'll need, and a list of basic geometric shapes in the drawing. I also share the location where I'm drawing the lesson—to show that you can draw anywhere!—and the tools I'll have on hand to use as hacks.

2. Next are a couple of instructional pages filled with hacks, tips, and techniques. I recommend you read these pages and practice the techniques before embarking on the drawing itself. I call identifying the basic geometric shapes in an object deconstructing the object. These instructional pages begin with a photo of the object we'll be drawing next to a deconstructed version of the object so you can see exactly what that looks like and how to do it. After this opening section I provide tips, measuring shortcuts, and explanations of any steps in that lesson's 30-minute drawing that might be confusing or complex. I'll also introduce you to some artistic terms, like perspective and contour, on a very practical level. (For handy reference, at the end of the book is a glossary with further explanations of the art terms and techniques I use in this book. Check it out on here.)

3. Each chapter contains a double-page spread on which you'll craft your 30-minute drawing without needing to turn any pages. On the left side are drawing instructions; on the right is a blank page, Your Drawing Page, ready for your creativity! Each 30-minute instruction is broken down into four clock-timed steps, generally along these lines:

1) Draw a blueprint made up of geometric shapes (Draw Your Blueprint).

2) Refine the blueprint to more closely match the photo ("Shape the Shapes").

3) Add shading (See the Light). The sun graphic represents the position of the light source.

4) Polish and refine the drawing (Finish Up!).

4. Bonus Challenge. On the final page of each chapter you'll find ideas for going beyond the first 30 minutes and creating more drawings related to the sketch you just drew. Sometimes I'll show you how to draw a related object; for example, after the 30-Minute Wine Bottle I provide instructions for drawing a wine glass. Sometimes I'll show you how to draw a similarly shaped object, and on occasion I'll teach more about a specific technique we used earlier in that chapter. And there are a few times you'll find other ways to create the same drawing. Drawing is fluid, and there's no one "right" way to accomplish your goals.

MY TOP SEVEN DRAWING TIPS!

Although you'll find plenty more lesson-specific tips in every chapter, the following ideas and techniques apply to most chapters and to most of your drawings, whether derived from this book or not. Here we go!

1. Draw Lightly

Erasing and refining make a drawing come to life. Nobody gets every line of a drawing exactly where they want it to be the first time. The techniques underlying these 30-minute lessons rely on erasing. Each drawing begins with basic shapes that are sketched quickly and almost as quickly erased and redrawn during the process. Even most of the shading is done in light layers. Make it easy on yourself and draw with a light hand.

2. Use a Smudge Shield

Protect finished parts of your drawing by placing a clean scrap of paper over them on which to rest your hand while you draw other sections. This will save you a boatload of frustration!

3. Remember: Your Paper Is Not Glued to Your Desk

It's not cheating to rotate your paper! Most people naturally find it easier to draw in one direction rather than the other; if you need to spin the paper to make it easier on yourself, do it!

4. Use the "Pencil-Measure" Hack

In many chapters you'll see the instruction to use the "pencil-measure" hack. You can always employ some version of this technique to determine and reproduce the relative size of parts of the object in your drawing. Hold up a pen or pencil, close one eye, and use it to measure the length or width of a part of the object you're drawing, noting the length or width with your finger on the appropriate spot on your pencil. You can do this whether the object is across the room, in one of the photos in this book, or on your computer screen. As you measure different parts of an object using this technique, make sure to stay the same distance away from the object; if you move toward it, it will be larger relative to your pencil and you'll have to start over.

5. Use Your Eyes to See Relative Size

Artists "see" parts of objects they draw in relation to other parts of objects they draw. Although I do suggest specific sizes for some of the drawings in this book, the sizes of each element in a drawing are all relative to each other. Keep that in mind as you draw. If you're drawing someone's head and torso, notice how many "heads" wide the torso is. Is the vase you're drawing three times as tall as it is wide? The pencil-measure hack will help you find the answers, as will the measuring shortcuts I provide in each chapter.

6. Make a Quick Ruler

Take a piece of scratch paper, fold it in half and half again and half again, unfold it, and voilà! The creases form an instant ruler—another quick way to keep the parts of the object in proportion. The measurements in drawing have little to do with an objective ruler; for example, you can use your pinky to make a ruler with pinky-sized increments, or you can measure your object in pennies.

7. I Love a Stumpy!

Blending the shading on pencil drawings can make the drawings look smooth and realistic. I usually blend shading with my finger or with a tool that's called a blending stump. These stumps, made of tightly rolled paper with a point at each end, cost less than a dollar apiece and are easy to find at any art supply store or online. I highly recommend you buy a pack.

But this book is all about being resourceful and using what's handy. If you don't have one, you can make your own stumpy easily! Use a folded napkin, tissue, or paper towel as your stumpy, or get a little more formal and wrap a folded soft paper around the end of a pencil (attach with a rubber band if there's one around).

You can use a stumpy on every drawing in this book! You'll find some practicing techniques in Lesson 16, 30-Minute Wine Bottle (here) and in Lesson 24, 30-Minute Seashell (here).

LET ME KNOW WHAT YOU THINK!

This book doesn't only include my art—several artist friends also contributed to parts of this book. You'll see their names listed in the Acknowledgments (here) and in the chapters to which they contributed. I'm thrilled to have other students and artists use this system and improve it with their own creative suggestions!

I hope you love doing these 30-minute drawings, and I especially hope you use the techniques in this book to keep creating your own. Please show me your art! Tell me how you're doing, and e-mail me your suggestions at . And no matter what, keep drawing!


LESSON 1

30-MINUTE BANANA

Bananas are just plain funny… even saying the word makes me chuckle. Whenever I draw bananas—which is quite often when I'm teaching kids how to draw—I'm reminded how much fun drawing can be and how whimsical any of us can be when we draw. My most popular drawing lesson with kids is my "Ninja Banana." I put a ninja mask and eyes on my banana sketch; the juxtaposition of the fi erce fi ghter and the mushy banana always cracks up kids—and me. So I won't mind if you laugh too while you draw this funny fruit!!

LOCATION

I'm drawing this banana at the Comic Con in Portland, Oregon, where I'm a guest artist. On a banana break, of course.

BANANA DRAWING TOOLS

Pencil

Eraser

Paper to draw on—or use the practice here

Your hand, a banana, or anything else with a curve to it

TODAY'S BANANA

Isn't this an aPEELing photo? Lucky me—I can't hear you groaning.

SHAPES IN A BANANA

DECONSTRUCTED BANANA

Okay, okay, I admit it—to draw a banana you start with… a banana shape. I call it a "curving oval" in keeping with the "draw the basic geometric shapes you see" system I use in this book, but yes, it's pretty much an oval that is shaped like a banana. You can do it! I also see triangles and rectangles in the shapes of the three peels that hang down.

30-MINUTE BANANA HACKS

Trace Your Hand Hack

If you happen to have a not-too-ripe banana within reach, you can use it to trace the curve of your banana shape. Heck, you can use anything nearby with a gentle curve (have a boomerang handy?). You could even curve your hand a little and trace that. But it's a pretty easy shape to sketch without a guide—give it a try (Figure 1)!

Holding Line Hack

Draw a holding line about a third down from the top of the banana. A holding line is a lightly drawn guideline (later erased) that helps you place other parts of a drawing. This visual guide will help you place the folding peels.

TIPS AND TECHNIQUES

Flip Tip

I find it's easier for me to draw a curve in one direction than the other. If you plan to draw the banana shape freehand, first practice some curves to see which direction flows better for you. Then flip your drawing paper or book around to ease your curve drawing. Remember: your paper is not anchored to the table!

I like to "push" the curve rather than "pull" it, moving my wrist like this (Figure 2):

Folding the Peel

Shading is the key to the illusion that the banana peel is actually folded over. Shade the nooks and crannies nearest the fold the darkest, then lighten as you move away from the fold (Figure 3).

Adding the peel's edges enhances the illusion that the peel is folding over on itself (Figure 4).

Measuring Shortcuts

If you draw a banana as long as your thumb, it's about the width of your pinky.

The exposed part of the banana is about a third of the length of the whole banana.

The curving triangle for the front peel begins in the center of the banana shape.

DRAW THAT BANANA!

1. Draw Your Blueprint

10 minutes!

Draw lightly!

Draw a curving oval with a holding line about one-third down on the banana as shown (Figure 1).

Draw triangles on each side of the banana, adjacent to the holding line (Figure 2).

Add rectangles below the side triangles and add a curving triangle (Figure 3).

2. Shape the Shapes

5 minutes!

Round the edges of each hanging peel.

Add a "V" shape showing the peel tear (Figure 4).

Erase extra lines (Figure 5).

3. See the Light

10 minutes!

Notice where the light strikes this image.

Shade the side opposite the light (Figure 6).

Shade the darkest darks: under the folds, in nooks and crannies (Figure 7).

Add a cast shadow darkest where the banana touches the surface (Figure 8).

4. Finish Up!

5 minutes!

Draw the stalk details and peel edges (Figure 9).

Lightly shade the peel to suggest a darker yellow tone; blend with your finger (Figure 10).


YOUR DRAWING PAGE


BONUS CHALLENGE: PRACTICE FOLDS

The folds in the banana peel give the drawing identity and dimension, the illusion of depth. This fast exercise will improve your skills at drawing folds—plus it's satisfying to quickly and easily create such an advanced-looking sketch! (Find more ways to draw folds and ribbons in Lesson 25, 30-Minute Ballet Slippers, on here.)

1. Draw a holding line across the middle of your page. Draw a series of connected loops on the line, as shown (Figure 1).

2. Map out where the parallel, angled lines I call "peek-a-boo" folding lines (where the material folds) will go, using dots. Each line will begin where the left or nearer edge of a bottom loop intersects the holding line. Dot those spots. Draw the first peek-a-boo line (on the far left) at about a 45-degree angle Figure 2).

3. Draw the rest of the folding lines, top and bottom, all at the same angle as the first. Important! The folding lines at the top begin on the far or right side of each loop top (draw dots if they help) (Figure 3).

4. Draw the edges of the ribbon connecting the folding lines (Figure 4).

5. Shade the areas opposite the light source. Darken most of the hidden places: on the surface under the ribbons and under the folds. Erase the holding line and dots (Figure 5).


LESSON 2

30-MINUTE MOUTH

If eyes are the windows into the soul, then perhaps the mouth is our doorway to the world. Open the door and share your ideas, creativity, laughter, and joy! Mouths are fun to draw in 30 minutes; they can be completed easily within the time window and are a great way to practice drawing contour lines that give curved objects fullness and shape. It's hard to go wrong drawing mouths. There are 7 billion people on the planet, which means there are billions of variations in mouth shapes. No matter how your drawing turns out, it probably looks like one of them!

LOCATION

I'm drawing this at a table in my local grocery store deli.

MOUTH DRAWING TOOLS

Pencil

Eraser

Paper to draw on—or use the practice here

Business card

Penny

TODAY'S MOUTH

Smoochy bisoux to you, my friends!

SHAPES IN A MOUTH

DECONSTRUCTED MOUTH

It took me some trial and error to find the basic shapes in this mouth. I finally realized the quickest blueprint is to draw a bisected diamond (a diamond divided down the middle). Circles at the fullest points of the top and bottom lips will help me shape and contour the lips later. The space between the lips is a semicircle (created by drawing one curved line). Notice that the teeth aren't part of my blueprint—they're important to the drawing, but I don't need to sketch them in at the beginning. As ever, the goal of the basic shape blueprint is to turn intimidating blank paper into an inspirational canvas!

Genre:

On Sale
Jun 20, 2017
Page Count
176 pages
ISBN-13
9780738218632

Mark Kistler

About the Author

Mark Kistler is the author of nineteen books, including You Can Draw in 30 Days and You Can Draw in 30 Minutes. He has worked as a classroom educator, a large audience presenter, an Emmy Award-winning television personality, a popular "virtual" instructor, and a respected drawing teacher for both adults and children. He lives near Houston, TX.
 

Learn more about this author