Cookie Craft

From Baking to Luster Dust, Designs and Techniques for Creative Cookie Occasions

Contributors

By Valerie Peterson

By Janice Fryer

Formats and Prices

Price

$14.95

Price

$19.95 CAD

Format

Format:

  1. Trade Paperback $14.95 $19.95 CAD
  2. ebook $9.99 $12.99 CAD

This item is a preorder. Your payment method will be charged immediately, and the product is expected to ship on or around April 7, 2015. This date is subject to change due to shipping delays beyond our control.

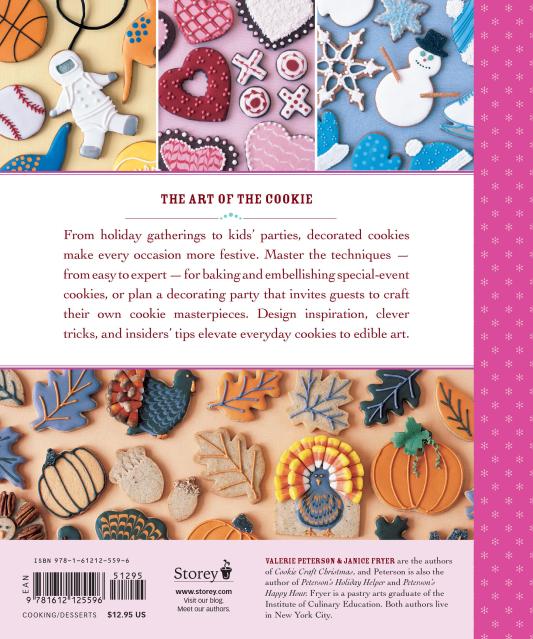
Beautifully decorated cookies are within reach for every home baker, thanks to the easy and practical methods developed by cookie-crafting enthusiasts Valerie Peterson and Janice Fryer. From rolling and cutting to flooding and piping, you’ll find dozens of techniques to turn plain cookies into fun treats for your next special occasion. With instructions for making stand-up cookies, tips on creating icing color palettes, and advice on freezing and shipping, the cookie fun never stops!

Excerpt

ACKNOWLEDGMENTS

Our thanks to Pam Art for warmly welcoming us to her house, and to Walter Wentz for making the auspicious introduction. We’re grateful to Margaret Sutherland, a very smart cookie, for pulling us in and pulling it all together; and to Deborah Balmuth for her always-calm support.

The concept of Cookie Craft was brilliantly illuminated by Alethea Morrison and her creative team, including Ellie Miller, Sophie Blackhall, Alison Kolesar, and the exceptionally talented and persevering Sara Neumeier. Our thanks to all.

We are indebted to the many, many behind-the-scenes people whose hands helped take the book from proposal to bookseller and beyond. Special shout-outs to Elaine Cissi, Elinor Goodwin, Stephanie Long and her team, Wes Seeley, and the members of the Storey and Workman sales forces, who welcomed this book with great enthusiasm — we don’t think it was just because we brought cookies!

Our deepest appreciation to our agent, Jennifer Griffin, for easing our transition to “the other side,” and for always helping us to see the big cookie when we were only looking at the crumbs.

To our especially tireless advisors — “Sascha’s mom,” Scott Dare, and Liz Harwell — a thousand thanks for your time and palates. To our creative guinea pigs, Sarah Durand, Sharon Gamboa, the McGowan family — especially Jane, Henry, Patrick, Madeleine, Charlotte, and John — Gemma Nedelec, Keith Pfeffer, and Mary Beth Thomas: our gratitude for your willingness and, always, for your good humor.

We are fortunate to have family, friends, and colleagues who made available their wisdom, advice, hands, shoulders, and taste buds. Thanks especially to Nanci Andersen, Rose Arlia, Steve Atinsky, the Bauers, Sandy Bell, the Bogdanovics, Rachel Bressler, Sandra Carey, Diana Cisek, Linda Dickey, Mary Dunn, the Finns, the Firstenbergs, Debbie Fryer, Jennifer Fryer, Mildred Fryer, Marge Ginsburg, the entire gang at ICE, Virginia Jenkins, David Latt (whose cookbook we’re waiting for), Emily Loose, the Lyngholms, Maryann Manelski, Leigh Marchant, the McSpedons, Sydney Miner, Eileen O’Neill, the extended Peterson family — especially Beverly, Lisa, Robert, and Rowena — Julia Pinto, Carolyn Rostkowski, the Tedeschis, the Tonons, the Towers, Paul and Lisa Von Drasek, and Diane Weingarten. For the innumerable others who have expressed their unflagging and enthusiastic support, please know how much we appreciate it.

Valerie would like to acknowledge the many colleagues and authors with whom she’s worked, and from whom she’s learned — especially her first “cookies,” Kevin Morrissey and the late Barry Bluestein. Her unwavering thanks go out to Janice, whose energy, quest for knowledge, and baker’s soul made this book possible.

Janice would like to thank Karen Daley, who started her on this journey; and Valerie, whose creative mind is truly amazing. Without her, this book would still be just a great idea.


PREFACE

Thanks to our moms, Mildred Fryer and Rowena “Weenie” Peterson, we each have always been comfortable in the kitchen. Janice has memories of baking under Mildred’s tutelage and to this day remembers the first lesson she learned: Baking is an exact science and measurements must be precise. This was frustrating to young Janice when it came time to lick the beaters because Mildred would scrape every last bit of batter from them for fear the recipe wouldn’t turn out right if she didn’t. Although Mildred and Weenie both made plenty of cookies in their day, neither had much time for royal icing, so we each looked elsewhere for that part of our cookie education.

As friends and colleagues with a common interest in baking, we coincidentally realized one holiday season that we were looking for the same thing: a cookie decorating book to instruct and inspire us. We didn’t find exactly what we envisioned, but we happily shared information and resources with each other and were able to take our cookie decorating to the next level. From making delicious, uniform sugar cookies that don’t spread during baking to designing cookie decorations and preparing the ever-temperamental royal icing, we came by our knowledge with plenty of research and perfected our techniques with our own trial and error.

As we became confident in our cookie decorating, we found ourselves stretching the boundaries of what we’d learned and exploring techniques we hadn’t seen anywhere to indulge our inner artists — for example, imprinting designs on cookies before baking to make a simple cat’s face, or layering unbaked cookies to create a Thanksgiving turkey, or even building cookie structures to hold more cookies, like our Santa’s sleigh centerpiece. Sometimes we felt more like crafters than bakers, but the results of our efforts are as delicious to eat as they are beautiful or fun to look at.

Over the years, as we were learning a lot the hard way, we kept saying, “Someone should write a book.” One day we looked at each other and realized we could be the “someones.” We hope you find what you need in Cookie Craft — a design to inspire you, a time saving tip, a new technique, a favorite cookie recipe, or even just the encouragement to create something delicious and beautiful, and to have fun doing it.

Here’s the thing …

In cookies as in life …

it’s all about the journey.

We’ll be with you along the way.

Janice & Valerie


Chapter 1

Cookie Craft Inspirations

Welcome to Cookie Craft! Part baking, part artful expression, cookie crafting allows you to create treats that are as delightful to the eye as they are to the taste buds. You may be a cookie beginner, or you may have years of decorating behind you. Our goal is to give you all the information you need to take your cookie crafting to the next level — whatever level that may be. We’ll share our hard-won hints and tips so you can maximize your cookie-making enjoyment and minimize wasted energy. We’ve broken down the various steps as thoroughly as possible for those of you who’ve never decorated before. But once you get started, you’ll see it’s easier than it seems — then it becomes addictive.

But where to start? Here’s what you’ll find as you work your way through the book. We always start with a delicious cookie — and the best cookies for decorating are flat on top, to create a uniform decorating surface. Using our recipes and our roll-chill-cut method with cookie slats (here) ensures that every cookie you bake will be the same thickness and speeds the baking process.

The cookies shown here are ideas to inspire you. You’re the creative genius – we’re just here to nudge you along!

If you’re a beginning cookie crafter, you may want to start with decorating your unbaked cookies. There are a variety of easy prebaking decorating techniques (outlined in chapter 5), such as affixing cookie add-ons (such as the nuts on the Thanksgiving turkeys) or imprinting cookies (as on some of the acorns). Because most of these techniques don’t require special equipment, it’s a good place for you to get your decorating feet wet.

In the realm of cookie crafting, decorating with royal icing can be a tremendous amount of fun — think of the cookie as your canvas and your icing colors as your paint (wearing a beret is optional). It does take a little practice, but you can get some experience with simple designs even before you buy any special decorating equipment by using just a zip-top freezer bag (as we did with the snowflakes and some of the fall leaves).

Maybe you’re a confident baker who’s handy in the kitchen; maybe you’ve even amassed a collection of cookie cutters but have never been motivated to use them beyond cutting out shapes and sprinkling them with some colored sugar. If so, you’re much like we were when we first started decorating. There’s a bit to learn — but you’ll have a great time unleashing your inner cookie crafter. You’ll want to master the royal icing piping and flooding techniques (that is, outlining and filling the cookies with royal icing). You can practice your piping skills with the template, and then you’re ready to explore the wealth of royal icing techniques pictured on cookies throughout the book.

If you’re already an accomplished decorator, we hope to provide you with a few hints you haven’t thought of or ideas to inspire you, especially with the Cookie Craft Showstoppers in chapter 7.

For all levels, the extensive photo arrays that follow provide more than two hundred designs for you to copy or use for inspiration in your own decorated cookie planning. Let your cookie cutters’ boundaries inspire you! A six-pointed Star of David can become a sheriff’s badge for a birthday boy’s party. A gingerbread man can become an astronaut. Round cookie cutters can make everything from a spiderweb to a baby’s bib. Look at your cookie cutters with an open mind — what can you create? For sharing your cookie crafting, we tell you how to pack and ship your cookies and how to orchestrate parties, swaps, and bake sales (see chapters 8 and 9).

So now you’re ready to begin. And if you have any hesitation, we’ll give you this food for thought: In cookies as in life, we learn from our mistakes. In Cookie Craft the lessons will be sweet, because you get to eat your mistakes — they’re pretty tasty!

HERE’S THE THING ABOUT COOKIE CRAFT METHODS

Everyone has his or her favorite way of doing things. Once you’ve had some cookie baking and decorating practice, our ways might not be yours. We’re fine with that – and if you come up with a better shortcut, let us know. But here we hope we’ll get you started in the right direction and in the right spirit to have fun with your cookies.

Cookie Craft for Holidays and Seasons

Holidays are the times to keep traditions and make new ones. Cookie making has long been a beloved activity, shared by parents and children, friends and neighbors. While shortcuts sometimes seem efficient, there is no substitute for a home-baked cookie made with fresh ingredients. Iconic holiday shapes, such as Valentine’s Day hearts, Halloween pumpkins, and Christmas ornaments, lend themselves to a wide variety of decorating possibilities. Cookie craft time can be family together time — many beloved memories are made and kept in the kitchen.

NEW YEAR’S

Usher in “the new” with sweet celebrations! (Maybe a last hurrah before the diet resolutions kick in?) In addition to the cookies pictured here, number-shaped cookies can proclaim the date on the new calendar. Some traditional New Year’s cookie-cutter shapes can double for other milestones — for example, champagne glasses for wedding congratulations and party hats for birthdays.

Cookies Featured

  1. 1.Champagne glass
  2. 2.White champagne glass
  3. 3.Striped noisemaker
  4. 4.Nearly midnight clock
  5. 5.Champagne bottle
  6. 6.Striped party hat
  7. 7.Polkadot party hat
  8. 8.Times Square ball
  9. 9.Polka-dot noisemaker
  10. 10.Striped party hat

Decorating Instructions

  1. 1. CHAMPAGNE GLASS. Pipe and flood “champagne”; sugar on wet flood. Affix gold dragees with piping icing on dry sugar.
  2. 2. WHITE CHAMPAGNE GLASS. Layer 1: Pipe and flood glass; let dry. Layer 2: Pipe and flood “champagne”; sugar on wet flood.
  3. 3. STRIPED NOISEMAKER. Prebaking: Use candy cane cookie cutter. After baking: Pipe and flood body; flood stripes on wet flood. Paint mouthpiece and band with luster dust on dry flood; pipe “noise.”
  4. 4. NEARLY MIDNIGHT CLOCK. Pipe and flood circle; add concentric circles with wet on wet flood. Pipe hands and numbers on dry flood; affix dragee with piping icing on dry flood.
  5. 5. CHAMPAGNE BOTTLE. Layer 1: Pipe and flood neck, cork, and label; let dry. Layer 2: Paint neck, cork, and label design with luster dust; pipe outline detail on label; let dry to touch. Paint plain portions of bottle with corn syrup; sprinkle with sanding sugar. In addition, we like to write in the actual new year with a food-safe marking pen.
  6. 6. STRIPED PARTY HAT. Pipe and flood triangle; flood stripes on wet flood; drop dragee on wet flood.
  7. 7. POLKA-DOT PARTY HAT. Pipe and flood triangle; flood dots on wet flood. Pipe pom-pom and edge accents on dry flood.
  8. 8. TIMES SQUARE BALL. Pipe and flood circle; paint luster dust on dry flood. Affix dragees with piping icing on dry luster dust. For a quicker cookie, skip the luster dust and drop the dragees right onto the wet flood.
  9. 9. POLKA-DOT NOISEMAKER. Prebaking: Use candy cane cookie cutter. After baking: Pipe and flood body; flood polka dots on wet flood; pipe “noise.”
  10. 10. STRIPED PARTY HAT. See cookie 6.

WINTER

Snow day? When it’s time to come in from the cold, cookie baking and decorating can provide hours of indoor fun for kids and adults alike. It doesn’t have to be complicated — for super-simple snowflakes, round, dark (chocolate or gingerbread) cookies can be piped with white icing using just a zip-top bag.

Cookies Featured

  1. 1.Blue-scarfed snowman
  2. 2.Round snowflake
  3. 3.Blue snowflake
  4. 4.Silver snowflake
  5. 5.Blue hat with white jimmies
  6. 6.Cutout snowflake
  7. 7.Pretzelarmed snowman
  8. 8.Ice skate
  9. 9.Three-dot mitten
  10. 10.Polka-dot mitten
  11. 11.Three-dot hat
  12. 12.Dotted snowflake

Decorating Instructions

  1. 1.BLUE-SCARFED SNOWMAN. Layer 1: Pipe and flood body; let dry. Layer 2: Pipe and flood hat and scarf; sugar on wet flood. Pipe eyes and mouth on dry flood.
  2. 2. ROUND SNOWFLAKE. Pipe lines and dots; sugar on wet piping. Try this one with a zip-top bag.
  3. 3. BLUE SNOWFLAKE. Pipe and flood; flood snowflake lines with wet flood. For a more precise effect, do the lines with piping on wet flood.
  4. 4. SILVER SNOWFLAKE. Layer 1: Pipe and flood; let dry. Layer 2: Paint luster dust on dry icing; pipe lines on dry luster dust; sugar on wet piped icing. For a quicker cookie, omit layer one, and instead paint entire cookie with luster dust; proceed with icing.
  5. 5. BLUE HAT WITH WHITE JIMMIES. Pipe and flood body of hat; let dry to the touch. Pipe and flood band and pom-pom; sprinkle wet flood with jimmies. Pipe stripes.
  6. 6. CUTOUT SNOWFLAKE. Pipe outlines and snowflake tips; sugar on wet piping. Pipe dots after sugaring.
  7. 7. PRETZEL-ARMED SNOWMAN. Layer 1: Pipe, flood, and sugar hat. Pipe and flood body; let dry completely. Layer 2: Pipe mouth and nose. Affix candy eyes and pretzel arms with piping icing.
  8. 8. ICE SKATE. Layer 1: Pipe and flood entire skate; let dry. Layer 2: Paint luster dust on skate blade; let dry. Pipe outline and laces.
  9. 9. THREE-DOT MITTEN. Layer 1: Pipe and flood entire mitten; let dry. Layer 2: Pipe dots using small round pastry tip; pipe band using larger round pastry tip.
  10. 10. POLKA-DOT MITTEN. Layer 1: Pipe and flood entire mitten. Flood polka dots on wet flood. Layer 2: Pipe and flood band; sugar on wet flood.
  11. 11. THREE-DOT HAT. Layer 1: Pipe and flood entire hat; let dry. Layer 2: Pipe dots using small round pastry tip; pipe pom-pom and band using larger round pastry tip.
  12. 12. DOTTED SNOWFLAKE. Pipe details; sugar on wet piping.

VALENTINE’S DAY

Nothing says “I love you” like handmade cookies — especially if they’re beautifully decorated. Like love, heart cutters come in many variations, and the resulting cookies will certainly be the way to anyone’s affections.

Cookies Featured

  1. 1.Pink heart with cutout
  2. 2.White heart with grid
  3. 3.Red heart with heart stripes
  4. 4.Chocolate and pink heart with small cookie heart
  5. 5.Pink heart with grid
  6. 6.Chocolate heart with jimmies
  7. 7.Sugared heart
  8. 8.Red heart with cutout
  9. 9.Hugs and kisses
  10. 10.Small red heart
  11. 11.Chocolate herringbone heart
  12. 12.Pink herringbone heart

Decorating Instructions

  1. 1. PINK HEART WITH CUTOUT. Prebaking: Cut out center heart. After baking, layer 1: Pipe and flood; let dry. Layer 2: Pipe dots; pipe and flood white heart; sugar wet piping and flood.
  2. 2. WHITE HEART WITH GRID. Layer 1: Pipe and flood entire heart; let dry. Layer 2: Pipe pink grid lines; pipe red grid lines over pink. Pipe dots at grid intersections.
  3. 3. RED HEART WITH HEART STRIPES. Pipe and flood entire heart; apply wet flood dots in alternating colors in rows; draw a toothpick from top to bottom of row, through the centers of the dots, to create hearts.
  4. 4. CHOCOLATE AND PINK HEART WITH SMALL COOKIE HEART. Layer 1: Pipe and flood heart within the heart; let dry. Layer 2: Pipe dot border around dried flood; affix smaller cutout cookie with piping icing.
  5. 5. PINK HEART WITH GRID. Layer 1: Pipe and flood; let dry. Layer 2: Pipe grid and outline; affix dragees to wet piping at grid intersections.
  6. 6. CHOCOLATE HEART WITH JIMMIES. Pipe and flood white heart; sprinkle jimmies on wet flood. Pipe dots.
  7. 7. SUGARED HEART. Pipe and flood; sugar on wet flood.
  8. 8. RED HEART WITH CUTOUT. Prebaking: Cut out small heart in center of cookie. After baking: Pipe and flood; let dry. Pipe dots on dry flood.
  9. 9. HUGS AND KISSES. Pipe and flood. Flood dots on wet flood. For hearts, draw toothpick through dots.
  10. 10. SMALL RED HEART. Pipe and flood.
  11. 11. CHOCOLATE HERRINGBONE HEART. Layer 1: Pipe and flood pink heart. Flood horizontal red stripes on wet flood; draw toothpick vertically through wet stripe, alternating direction from top to bottom, bottom to top; let dry. Layer 2: Pipe dots around border of flood and of cookie.
  12. 12. PINK HERRINGBONE HEART. Layer 1: Pipe and flood. Flood horizontal stripes on wet flood; draw toothpick vertically through wet stripe, alternating direction from top to bottom, bottom to top; let dry. Layer 2: Pipe dots.

Genre:

  • “Wow. This book might even stop Martha Stewart in her tracks. The cookies are gorgeous and the level of detail is stunning. Instructions include drying time of icing, how to keep metal cookie cutters rust-free, a half-dozen Royal Icing recipes, color palette formulas, plus pages of templates. If cookies are your thing, this book is your lifeline.”

    Minneapolis Star-Tribune

    “If you've longed to make those perfectly iced cookies you see in bakeries and magazines, there's a new book that will get you from dough to done with minimal hassle…[A]nyone who wants to make beautiful cookies will find [Cookie Craft] jammed with ideas and advice.”

    J.M. Hirsch, Associated Press

    “A must-have for this particularly driven subset of the baking crowd, by New Yorkers who write about food and have mastered pastry arts. The authors take an A-to-Z approach in planning, creating, storing and shipping decorated cookies.”

    Washington Post

    “Word to the wise: Thumb through Cookie Craft after eating. Otherwise, the pages packed with sugary confections will turn you into an insatiable cubicle cookie monster. Those who like to get their hands doughy, regardless of skill level, can find a manageable project here.”

    Washington Express

    "[The] cookies in this book whet the reader’s appetite . . . its tone is one of a helpful friend rather than stern directives."

    ForeWord Magazine

On Sale
Apr 7, 2015
Page Count
158 pages
Publisher
Storey
ISBN-13
9781612125596

Valerie Peterson

Valerie Peterson

About the Author

Valerie Peterson is the co-author of Cookie Craft and Cookie Craft Christmas, and the author of Peterson’s Happy Hour and Peterson’s Holiday Helper. Prior to her full-time writing career, she worked for various publishers including Random House and John Wiley. She lives in Manhattan, New York.


Janice Fryer is co-author of Cookie Craft and Cookie Craft Christmas. She is a Pastry Arts graduate of the Institute of Culinary Education in New York City, and lives in New York. 

Learn more about this author